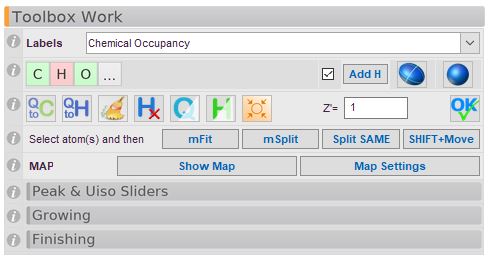
Toolbox Work
-
Labels: Choose from the drop-down menu what should be displayed on the atom labels. Most of these are self-explanatory, but here are a some comments:
-
Labels OFF/ON: This will toggle between switching any labels off and on. Pressing
F3will do the same action. -
Atom Names: Shows the atom names of non-H atoms as well as the labels for electron density peaks. Q1 is the largest peak.
F3will toggle this label. -
Crystallographic Occupancy displays the occupancy of any atoms. Please note that atoms in special positions will also display a number, but this does not mean that the site is not fully occupied. Unless you really know what you are doing, the Chemical Occupancy choice is probably the one you want.
>>labels -o. -
Chemical Occupancy displays the occupancy of any atoms which are not 100% occupied i.e. their occupancy is not 1. As opposed to the “Crystallographic occupancy”, the multiplicity of atoms in special positions will be taken into account. An atom on a centre of inversion has a crystallographic occupancy of 0.5, but from a chemical point of view it is fully occupied. So in this mode, if there is a number displayed next to an atom, this means it is a partially occupied site.
>>labels -co -
Parts displays PART numbers for atoms that are not in PART 0. By default, all atoms are in PART 0, unless they have explicitly been assigned to another PART.
-
Link-Code: this is displayed SHELX FVAR style: 21 and -21 etc. This denotes atoms whose occupancy is linked: the occupancies of atoms in 21 and -21 have to add up to unity.
-
H Atom Labels will include the hydrogen atom labels along with the atom name and Q-peak labels.
-
Fixed Parameters: if any parameters are fixed, these will be displayed as the atom label: occupancy, xyz, {U_(eq)}.
-
Variables : displays all variables associated with the atom.
-
AFIX Commands: useful to check AFIX commands that are being applied to the structure.
-
Q-Peak Intensities intensities of the Q-peaks will be displayed.
-
-
Atom Types: During model building, changing the atom type of a mis-assigned atom is a fairly common operation. We display the atom types that are in the list as little coloured buttons. A green button means that the number of atoms of the type that is actually present in the structure matches the provided formula. A blue button means that there aren’t enough of this type and a red button means that this atom type has been over-assigned. The … button allows you to access the periodic table.
You can also use the right-click menu to change the atom type, or use the command-line: select the atom(s) you want to change and type
>>name Nto change all selected atoms to, for example, nitrogen.
-
Add Hydrogen Atoms: Olex2 will place hydrogen atoms geometrically and automatically. Any relevant constraints will also be added. For almost all hydrogen atoms, our placement routine works very well (including solvent water molecules, amines etc). If a hydrogen atom should be placed in the wrong place, simply delete the one wrongly placed atom and try this again. Very often you will find it is now correctly placed. From the command-line, the command is
>>hadd. -
Isotropic/Anisotropic: In the early phases of structure building, atoms are refined isotropically (i.e. modelled as spheres). To change this to anisotropic refinement (i.e. modelled as ellipsoids), press the ellipsoid button. If nothing is selected, all atoms will be changed.
If the little tick-box is ticked, your structure will be refined after hydrogen atoms are added or there is a change in isotropic/anisotropic refiment. This is usually convenient, becase you can be sure that what you have on the screen will actually make sense before you delve too deeply into modifying your model.
-
Useful Shortcuts:
-
Q To C: Converts all showing Q-peaks to carbon atoms. This tool is not recommended. Please use the Clean tool
 as described below.
 >>name $Q C. -
Q To H: Converts all showing Q-peaks to Hydrogen atoms. This tool is not recommended. The Olex2 hydrogen placement routine is clearly the better way!
>>name $Q H. -
Clean (Brush): Peaks that are too small will be deleted and larger peak will be converted to carbon. Impossible atoms will be deleted and some other atom type assignments may be made. This tool is suprisingly useful in the early stages of model building (soon after structure solution).
>>clean. -
Delete Hydrogen Atoms: If nothing is selected, all hydrogen atoms in the structure will be deleted. Otherwise, the selected atoms will be deleted.
>>kill $H. -
Show/Hide Peaks: The display of Q-peaks is cycled through these stages: Show -> Show with Bonds -> Hide. (CTRL+Q).
-
Show/Hide Hydrogen Atoms: The display of hydrogen atoms is cycled through these stages: Show -> Show with internal H-bonds -> Hide. (CTRL+H).
-
Center: This centers the structure on the screen and assembles all fragments.
-
-
Set Z' and Formula: The OK button will adjust the reported chemical formula so it agrees with the atoms that are currently in your model. The final formula depends on the value of Z' that you choose.
-
PARTS and Disorder: This line is only shown when any of the atoms in the model have been assigned to a PART.
-
Show PARTS 0 AND: All atoms of PART 0 and all atoms belonging to the chosen PART will be shown. Each view here should afford a recognisable and chemically feasible moiety on the screen.
>>ShowP 0 1,>>ShowP 0 2,>>ShowP. -
Unique: When you tick this box while an atom is selected, Olex2 will only display the fragment of the structure that contains the selected atom (
>>uniq). If it is ticked, the chosen fragment will continue to be shown in isolation if you visualise the various PARTS. -
Labels: These provide the label options that only make sense in the presence of PARTs.
-
-
Split Atoms with: These links provide one way to start modelling disorder in Olex2. This is a mode: you select the tool first, then you click the atoms you wish to split.
-
No Restraint: The two split atoms will be refined freely; no restraints will be applied. The occupancy will be set to 0.5 for each atom and this value will refine freely.
-
EADP: The EADP constraint will be applied to both atoms.
-
ISOR: The ISOR restraint will be applied to both atoms.
-
SIMU: The SIMU resrtaint will Be applied to both atoms.
-
-
Select Group and then…: This is an alternative (and altogether better) approach to generating disorder model in Olex2. It can also be used to move atoms from their current position. This tool is easy to use, but hard to explain.
-
Split: After you made your selection, you can “activate” a bond around which you want to rotate (and split) an entire group. New atoms are generated and placed for all selected atoms and the occupancies are linked.
-
Fit: This works exactly like above, but the group will be placed in the new position (atoms will be moved). No new atoms will be generated and the occupancies are not affected.
-
Split or move with SHIFT Key: After you make a selection, you can move the selection with the LEFT mouse whilst the SHIFT Key is pressed. If you do not hold the SHIFT Key down, the atom will be split instead. While this is also a useful tool, this can be confusing if you do not expect that to happen!
-
-
Peak And Uiso Sliders: Using these sliders, you can make a selection based on one of these two properties of the atoms:
-
Peak: Moving the slider to the left will select the smallest peaks first and moving it to the right will select the largest peaks first.
-
Uiso: Exactly as above but atoms are selected based on their Uiso values.
-
-
Growing: Quick links to common symmetry operations are supplied by these three drop-down menus.